Capturing the essence of your home through photography requires more than simply pointing your camera at a beautiful space. The art of interior photography hinges on mastering fundamental principles that transform ordinary snapshots into compelling visual stories. Whether you are a homeowner documenting your recent renovation or an aspiring photographer looking to refine your craft, understanding how to compose your shots with precision and intention can elevate your images from mundane to magnificent. By combining technical knowledge with an appreciation for aesthetics and functionality, you can create photographs that not only showcase your living spaces but also evoke the warmth and character that make a house truly feel like home.
Fundamental composition principles for interior photography
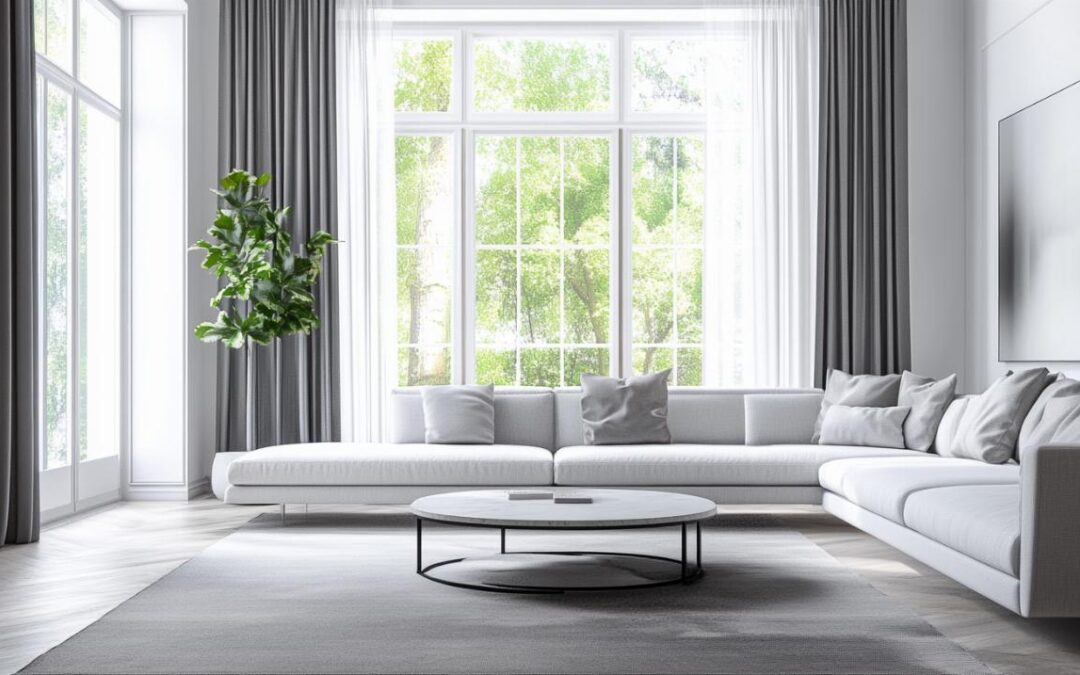
At the heart of every stunning interior photograph lies a solid grasp of composition principles. Among the most celebrated techniques are the rule of thirds and the golden ratio, both of which guide photographers in creating balanced and visually engaging images. When photographing a room, imagine dividing your frame into a grid of nine equal sections using two horizontal and two vertical lines. Positioning key elements such as furniture, architectural features, or focal points along these lines or at their intersections naturally draws the viewer's eye and creates a sense of harmony. This approach is particularly effective in home environments where you want to highlight specific design elements without overwhelming the viewer with clutter.
The Rule of Thirds and Golden Ratio in Room Photography
The rule of thirds serves as an accessible starting point for photographers at any skill level. By placing your main subject off-centre, you introduce visual interest and prevent the composition from feeling static. Meanwhile, the golden ratio, a mathematical proportion found throughout nature and classical architecture, offers a more refined approach for those seeking to imbue their images with timeless elegance. This ratio can be particularly useful when photographing interiors that feature strong architectural lines or carefully curated design elements. Embracing these photography composition techniques allows you to strike the perfect balance between symmetry and dynamic tension, ensuring that each image tells a cohesive story about the space.
Leading lines and visual flow through living spaces
Another essential aspect of composition involves the use of leading lines to guide the viewer's gaze through the photograph. In home interiors, these lines might be formed by wooden windows, the edge of a dining table, or the contours of a staircase. By positioning your camera so that these lines converge towards a focal point, you create a sense of depth and movement that invites exploration. This technique is especially effective in open-plan living areas where multiple zones merge seamlessly. When combined with careful attention to natural light, leading lines can transform a simple room into a dynamic visual narrative that highlights both the aesthetics and functionality of the space.
Strategic Use of Angles and Perspectives in Home Photography
The angle from which you photograph an interior can dramatically alter the perception of the space. A well-chosen perspective not only captures the physical dimensions of a room but also conveys its atmosphere and character. Whether you opt for a wide-angle lens to encompass an entire living area or a standard lens for more intimate details, the key is to remain mindful of how different focal lengths influence the final image. Wide-angle lenses can make small spaces appear more expansive, while standard lenses offer a more accurate representation of proportions and scale.
Wide-angle versus standard lens approaches for room coverage
When deciding between a wide-angle and a standard lens, consider the story you wish to tell. A wide-angle lens is ideal for showcasing the full scope of a room, capturing everything from floor to ceiling and wall to wall. This approach is particularly beneficial in compact urban flats where maximising the sense of space is paramount. However, it is important to use this tool judiciously, as excessive distortion can make furniture and architectural features appear unnaturally stretched. On the other hand, a standard lens provides a more truthful rendering of the interior, making it a preferred choice for detailed shots of design elements such as bespoke cabinetry or carefully styled vignettes. Balancing these two approaches within a single photo session can yield a comprehensive visual portfolio of your home.
Eye-Level and Elevated Viewpoints for Maximum Impact
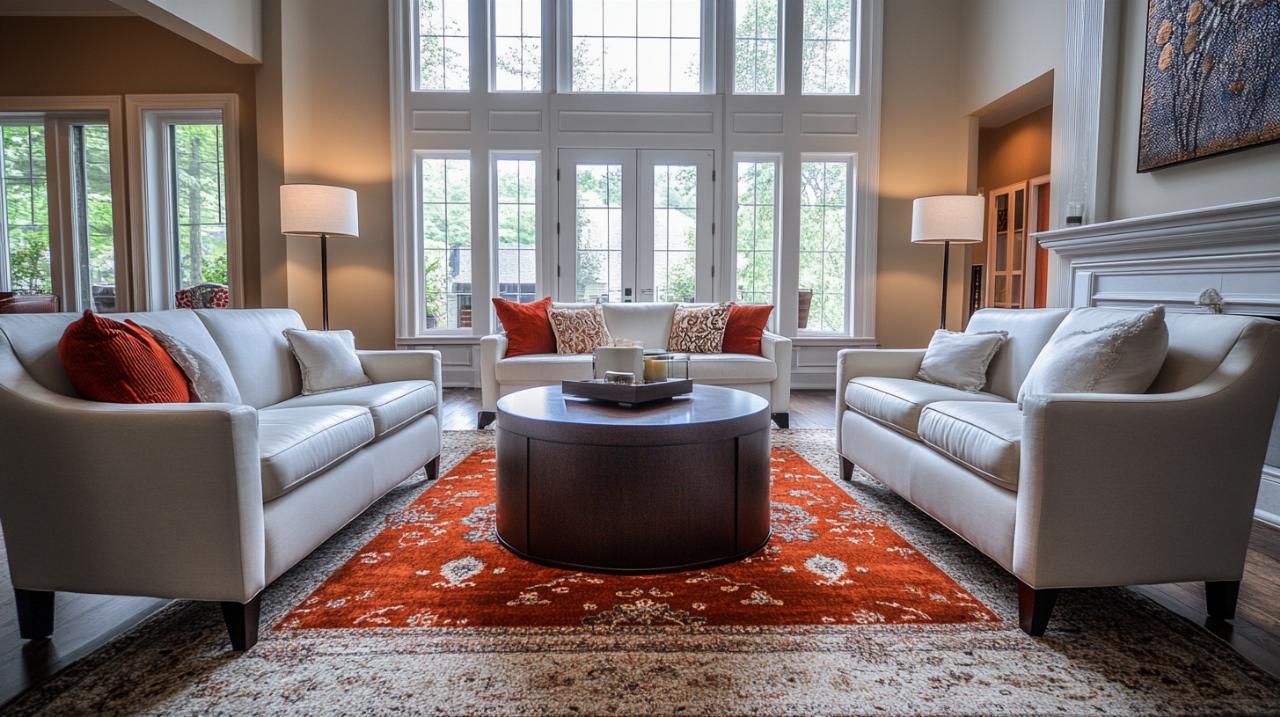
The height at which you position your camera is equally crucial in interior photography. Shooting at eye level, typically around waist height, creates a natural and relatable perspective that mirrors how we experience spaces in everyday life. This viewpoint is particularly effective in bedrooms and living rooms, where the goal is to convey comfort and livability. Conversely, an elevated viewpoint can offer a fresh take on familiar environments, revealing patterns and spatial relationships that might otherwise go unnoticed. This technique is especially useful in capturing the layout of a zen bathroom or the symmetry of a well-organised kitchen. By experimenting with both eye-level and elevated perspectives, you can discover new dimensions within your home and present them in a way that feels both familiar and intriguing.
Framing techniques to enhance interior architectural features
Framing is a powerful compositional tool that directs attention to specific elements within a photograph while providing context and depth. In interior photography, natural frames such as doorways, windows, and archways can be used to great effect, transforming a simple shot into a layered visual experience. By positioning your camera so that these architectural features frame the main subject, you add a sense of structure and narrative to the image. This technique not only highlights the design consultant's vision but also creates a visual journey that guides the viewer through the space.
Using Doorways and Windows as Natural Frames
Doorways and windows serve as ready-made compositional frames that can elevate your interior photographs. A doorway, for instance, can provide a clear boundary that draws the eye into an adjoining room, creating a sense of anticipation and discovery. Similarly, windows can frame outdoor views or flood a space with natural light, adding both context and atmosphere. When shooting through a doorway, ensure that the lines are kept straight and that the framing element does not dominate the composition. Instead, it should subtly enhance the focal point, whether that is a beautifully styled dining table or a cosy reading nook. This approach is particularly effective in homes with strong architectural features, where the interplay between different zones creates a rich tapestry of design.
Layering depth through foreground and background elements
Creating depth in interior photography involves more than simply capturing a single plane; it requires thoughtful layering of foreground, middle ground, and background elements. By including objects in the foreground, such as indoor plants or a carefully placed piece of furniture, you add dimension and invite the viewer to step into the scene. This technique is especially useful in large, open spaces where the risk of a flat, lifeless composition is higher. The middle ground might feature the main subject, such as a statement sofa or an elegant fireplace, while the background provides context through architectural details or subtle decor. This layered approach not only enhances visual interest but also mirrors the way we naturally explore and experience our home environments.
Mastering Natural and Artificial Lighting in Home Interiors
Lighting is perhaps the most critical element in interior photography, capable of transforming a good photograph into a truly stunning one. Natural light, in particular, offers a soft, flattering illumination that highlights textures and colours without the harshness of artificial sources. However, relying solely on natural light is not always practical, especially in spaces with limited window access or during the darker months. Understanding how to balance and combine different light sources is essential for achieving professional results.
Harnessing window light for soft, flattering illumination
Window light is a photographer's best friend when it comes to interior shots. The soft, diffused quality of natural light streaming through a window can bring a room to life, casting gentle shadows that add depth and dimension. To make the most of this resource, consider the time of day and the orientation of your windows. Morning light from east-facing windows tends to be cooler and more energising, while afternoon light from the west offers a warmer, golden glow. When photographing a space, position yourself so that the window light falls across your subject, avoiding direct backlighting that can result in silhouettes. If the light is too harsh, diffuse it with sheer curtains or wait for overcast conditions, which provide an even, natural illumination ideal for capturing the true colours and textures of your interiors.
Combining Ambient and Accent Lighting for Dramatic Effect
While natural light is invaluable, incorporating artificial lighting can enhance the mood and highlight specific features within a room. Ambient lighting, such as overhead fixtures or recessed lights, provides a general illumination that ensures the space is evenly lit. Accent lighting, on the other hand, draws attention to particular design elements, such as artwork, architectural details, or a beautifully styled mantelpiece. When combining these sources, aim for a balanced exposure that avoids overly bright spots or deep shadows. This technique is particularly effective in creating a spa style atmosphere in a zen bathroom or adding drama to a contemporary living area. By thoughtfully layering different types of lighting, you can craft images that are both technically sound and emotionally resonant.
Achieving Visual Balance and Harmony in Interior Compositions
Visual balance is the foundation of a harmonious photograph, and achieving it requires careful consideration of how elements are arranged within the frame. Whether you favour symmetrical compositions that convey order and tranquillity or asymmetrical arrangements that introduce dynamism and energy, the goal is to create a sense of equilibrium that feels natural and pleasing to the eye. This balance is not merely about aesthetics; it also reflects the functionality and purpose of the space you are photographing.
Symmetrical versus asymmetrical arrangements in room photography
Symmetrical compositions are characterised by a mirror-like balance where elements on one side of the frame are echoed on the other. This approach is particularly effective in formal settings, such as dining rooms or master bedrooms, where a sense of order and refinement is desired. By positioning your camera centrally and ensuring that architectural features and furnishings are evenly distributed, you create a calm, balanced image that invites contemplation. Asymmetrical compositions, by contrast, introduce visual tension by placing elements off-centre or varying their size and weight. This technique can add vitality and interest to more casual spaces, such as a cosy lounge or a creative home office. Both approaches have their merits, and the choice between them should be guided by the character of the space and the story you wish to tell.
Managing Negative Space and Clutter for Clean Compositions
Negative space, the area around and between the main subjects in a photograph, is a powerful tool for creating clean, uncluttered compositions. In interior photography, managing this space is essential for ensuring that the viewer's attention remains focused on the key elements of the design. Too much clutter can overwhelm the eye and obscure the beauty of your home environments, while excessive negative space can make a room feel empty and uninviting. Striking the right balance requires careful editing and styling before you even press the shutter button. Remove extraneous objects, tidy surfaces, and arrange decorative items in a way that feels intentional rather than haphazard. This attention to detail not only enhances the visual appeal of your photographs but also reflects the principles of good interior design, where every element serves a purpose and contributes to the overall harmony of the space.
In conclusion, mastering the art of interior photography is a journey that combines technical skill with a deep appreciation for design and aesthetics. By applying fundamental composition principles, experimenting with angles and perspectives, utilising natural frames, and harnessing the power of light, you can capture your home in a way that is both truthful and inspiring. Whether you are documenting a recent home transformation, preparing images for a design consultant portfolio, or simply celebrating the beauty of your own living spaces, these techniques will serve you well. Remember that every photograph is an opportunity to tell a story, to reveal the character and warmth of your interiors, and to share your unique vision with the world. With practice and patience, you will find that the camera becomes not just a tool for recording spaces, but a means of expressing the very essence of what makes a home truly special.